Modifications
Here are the modifications I have done so far. I have a 2025 Thor Geneva (Vegas/Axis) model 24VS (24.1). Many of these are common to most models and years.
Projects
electrical | vent fans | internet | shower | accumulator tank | air conditioning
ELECTRICAL |
[back to top] |
|---|---|
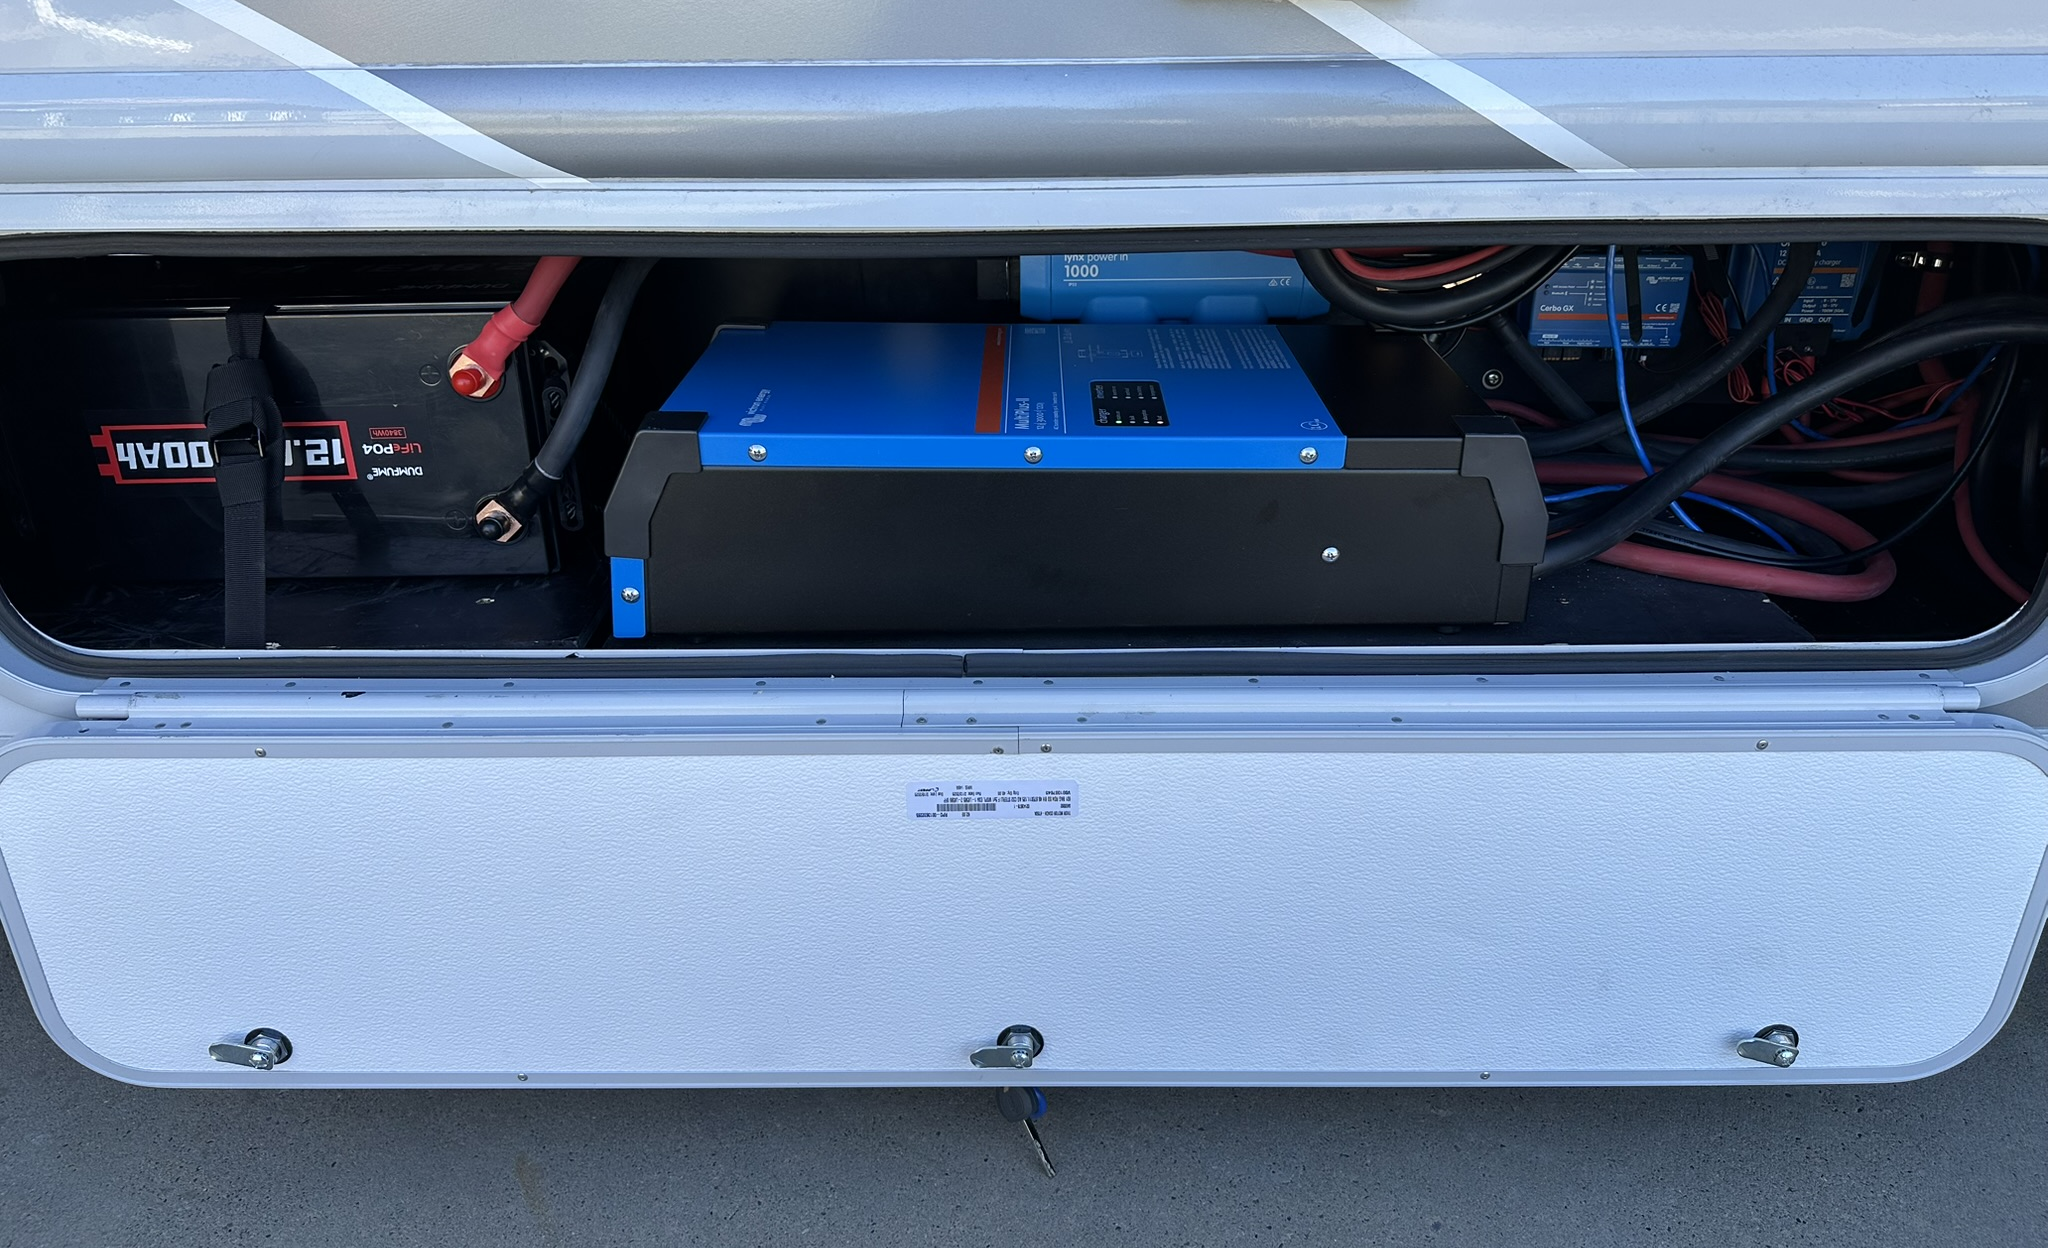 |
Phase 1 of my electrical upgrades included two 300ah lithium batteries, a Victron 3k inverter/charger, a DC/DC charger, and a MPPT Solar Charge Controller for the portable solar array. The RV now can run everything from the inverter. For a more complete list of items used, please see Electrical Purchases. I decided to take up the storage bay just next to the main door and have the electrical equipment accessible. All of the main battery and charger wiring had to be replaced with larger capable of handling the increase amperage. |
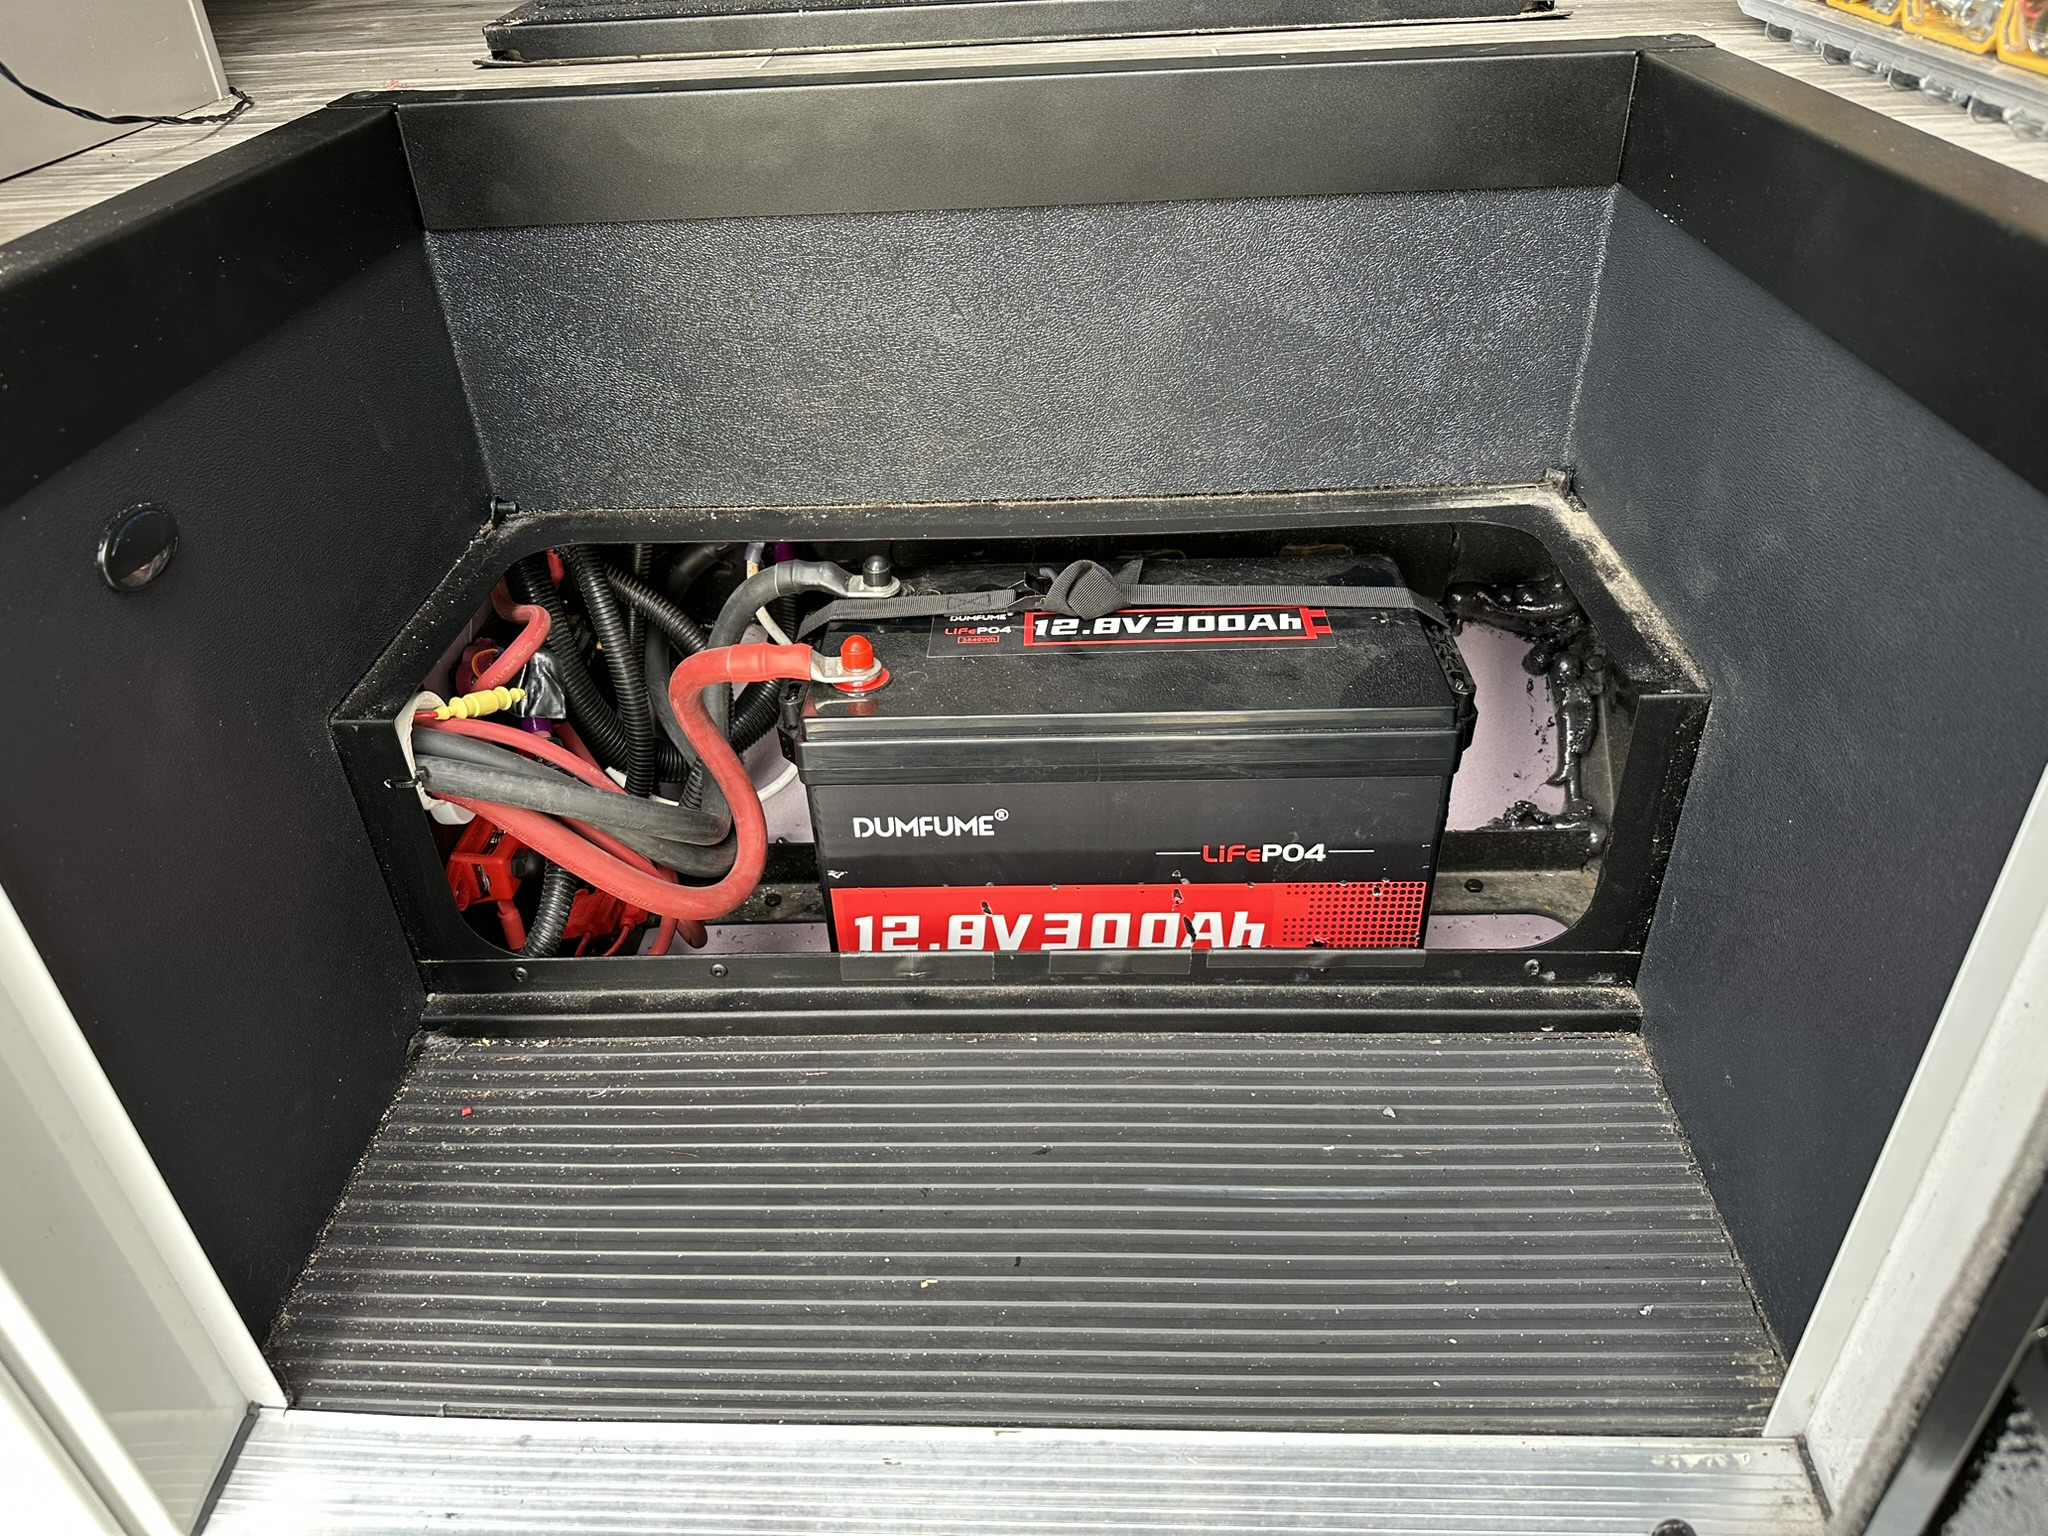 |
I retrofitted the existing battery compartment to fit one Dumfume 300ah lithium battery and the other is in the storage bay with the rest of the electral equipment. These provide a total of 600 amp hours of power and only weigh about 100 pounds total. The battery compartment is now completely enclosed and insulated on bottom and sides since there is no need for ventalation and they should not get too cold. Another benefit to using this space is that if you are in an area below freezing, you can simply remove the top-step cover and the heat from the cabin will keep the batteries warm. To enclose the existing battery compartment, I used 1" "pink" insulation board and galvanized metal roofing to cover the bottom - both from Home Depot. I painted all the underneath covers with Rust-Oleum rubberized Undercoating. |
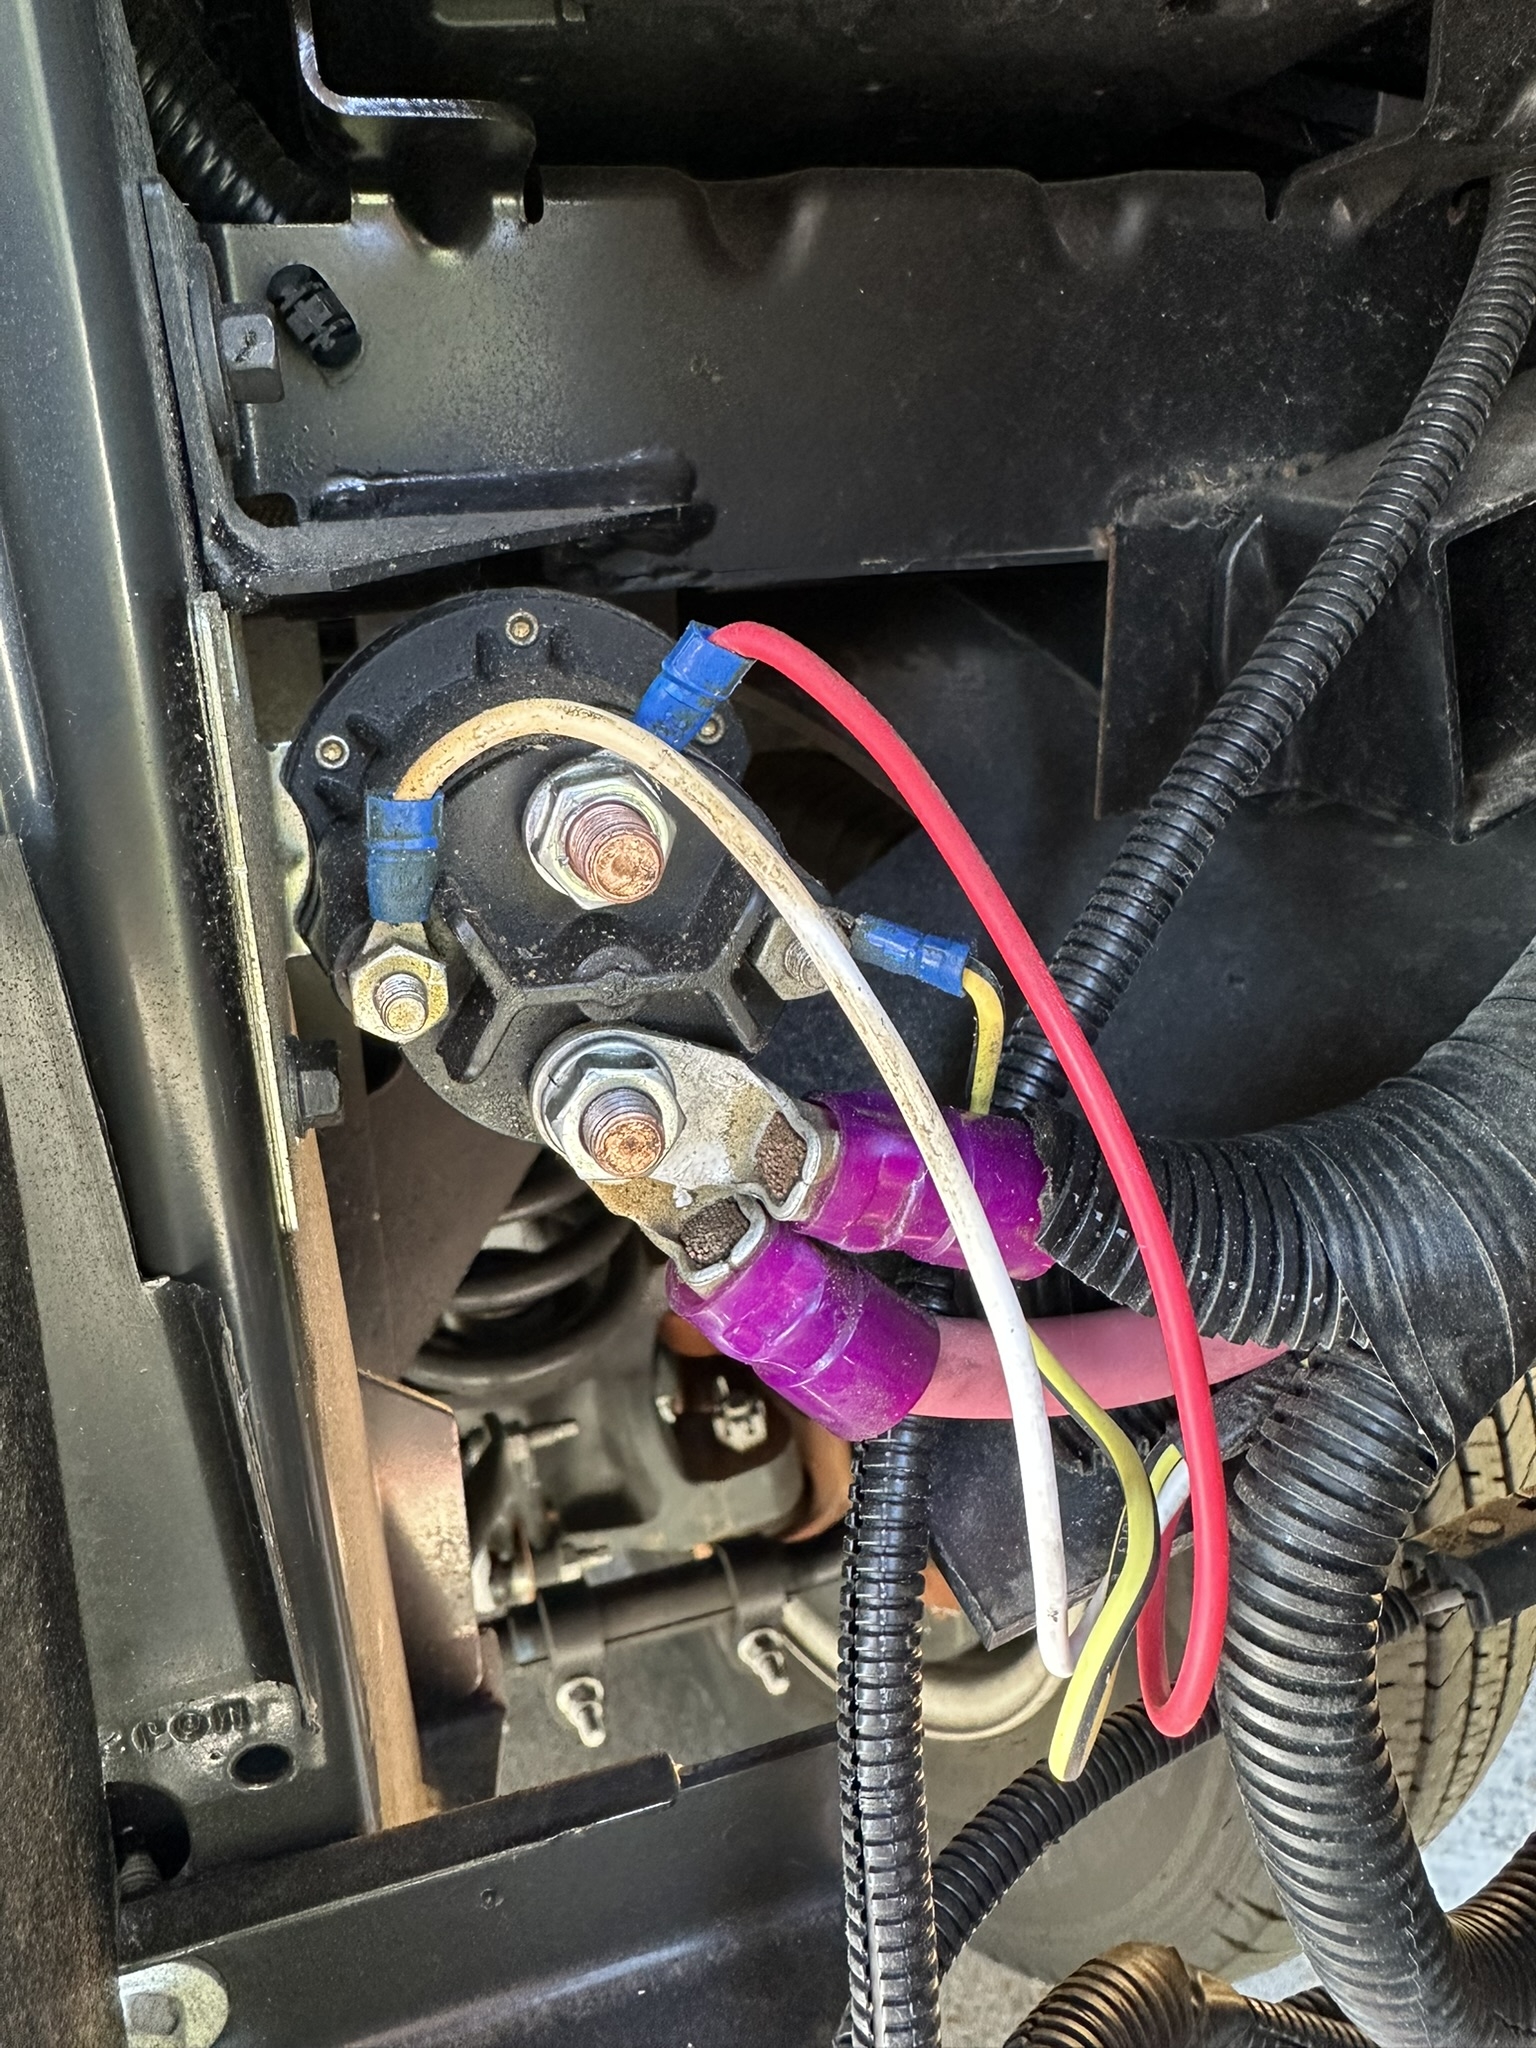 |
I switched the old charge wire connection on the Continuous Solenoid so it is no longer switched. Now, because the house batteries are no longer connected to the chassis battery, I used the existing wire that is now directly connected to the chassis battery to feed the DC/DC charger. I connected the generator starter power and solor charge wires directly to the Linx Distributor in the electrical bay so they will work properly. I removed the old master 12v battery cutoff switch and installed the Victron Digital Multi Control Panel GX in its place. |
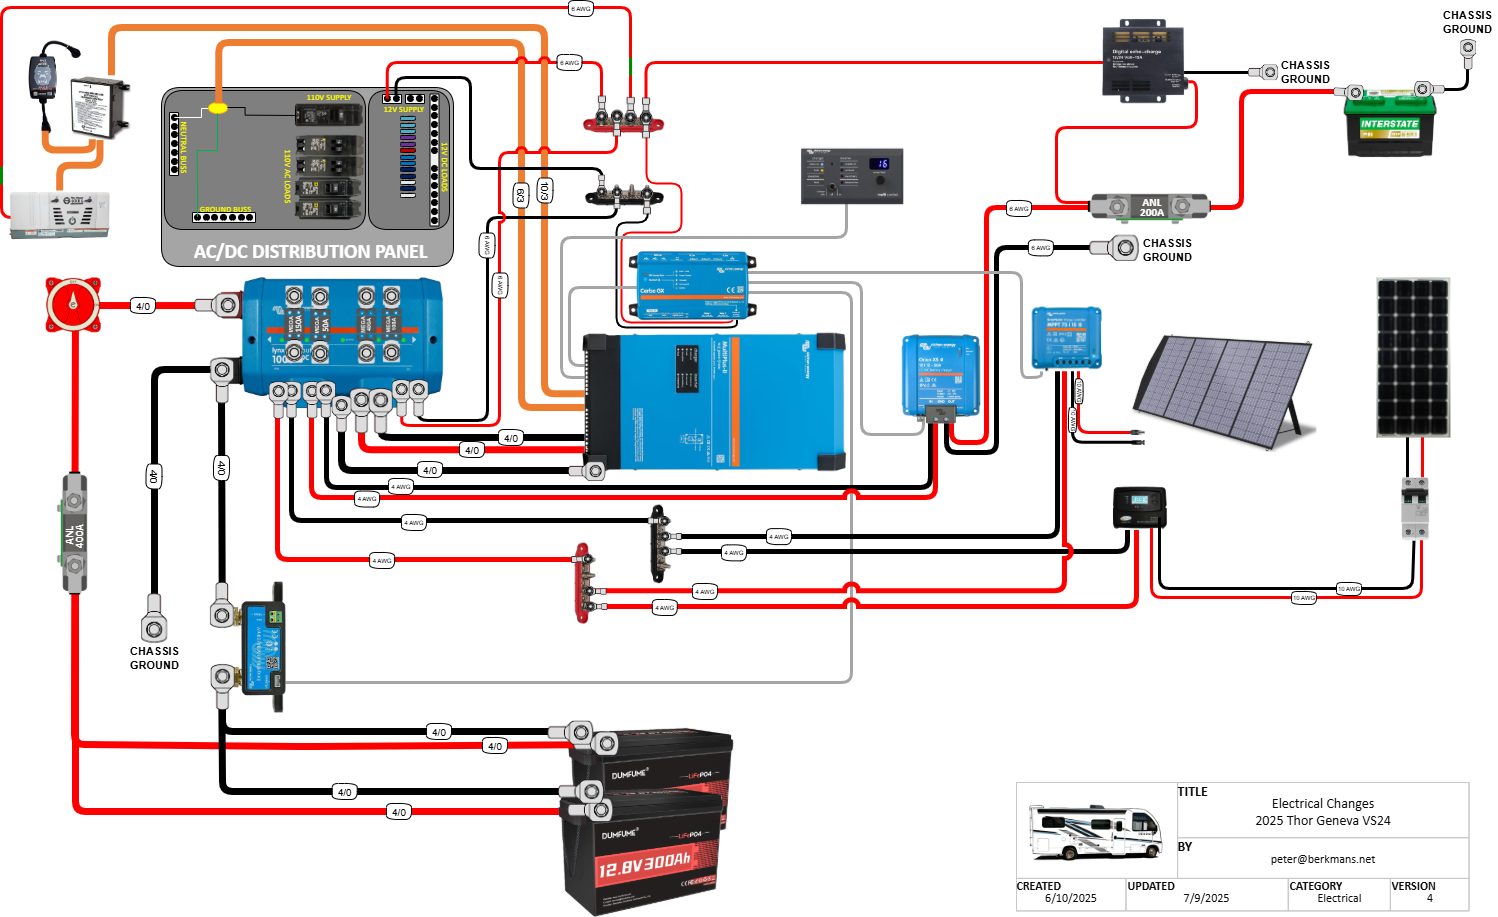 |
The new Victron MultiPlus-II Inverter/Charger has a feature called Power Assist. This allows the inverter to produce up to 50amps instead of the original 30amps. Due to this, I replaced the main 110v 30amp supply circuit breaker in the AC/DC distribution panel with a new 50amp one to allow the system to take advantage of this feature. Click on the image to the left for a full resolution diagram showing the new wiring system. |
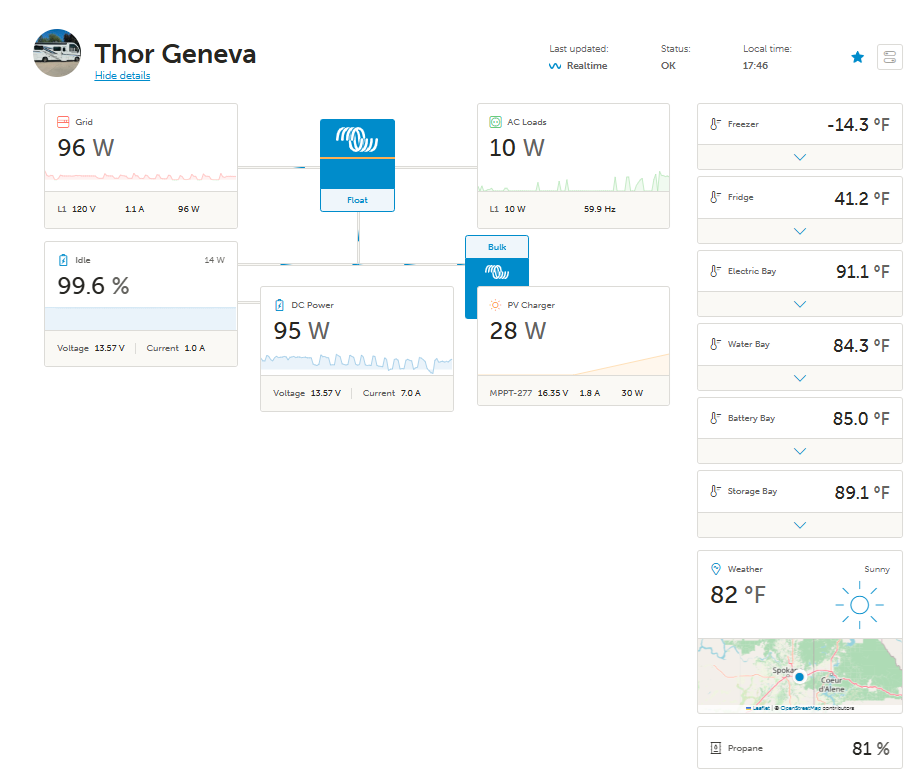 |
I installed RuuviTags in the places I wanted to monitor temperature. These have extremely long battery life and they connect instantly to the Victron CerboGX and show up in the dashboard - click the picture on the left to see a larger view. I wanted to be able to monitor the system from anywhere over the Internet. I installed the Victron Cerbo GX System Monitor which connects to all the VE.Direct/Bus connections on the other components and makes them available to the Victron App anywhere in the world. NOTE: you must have an Internet connection in the RV that it can connect to. |
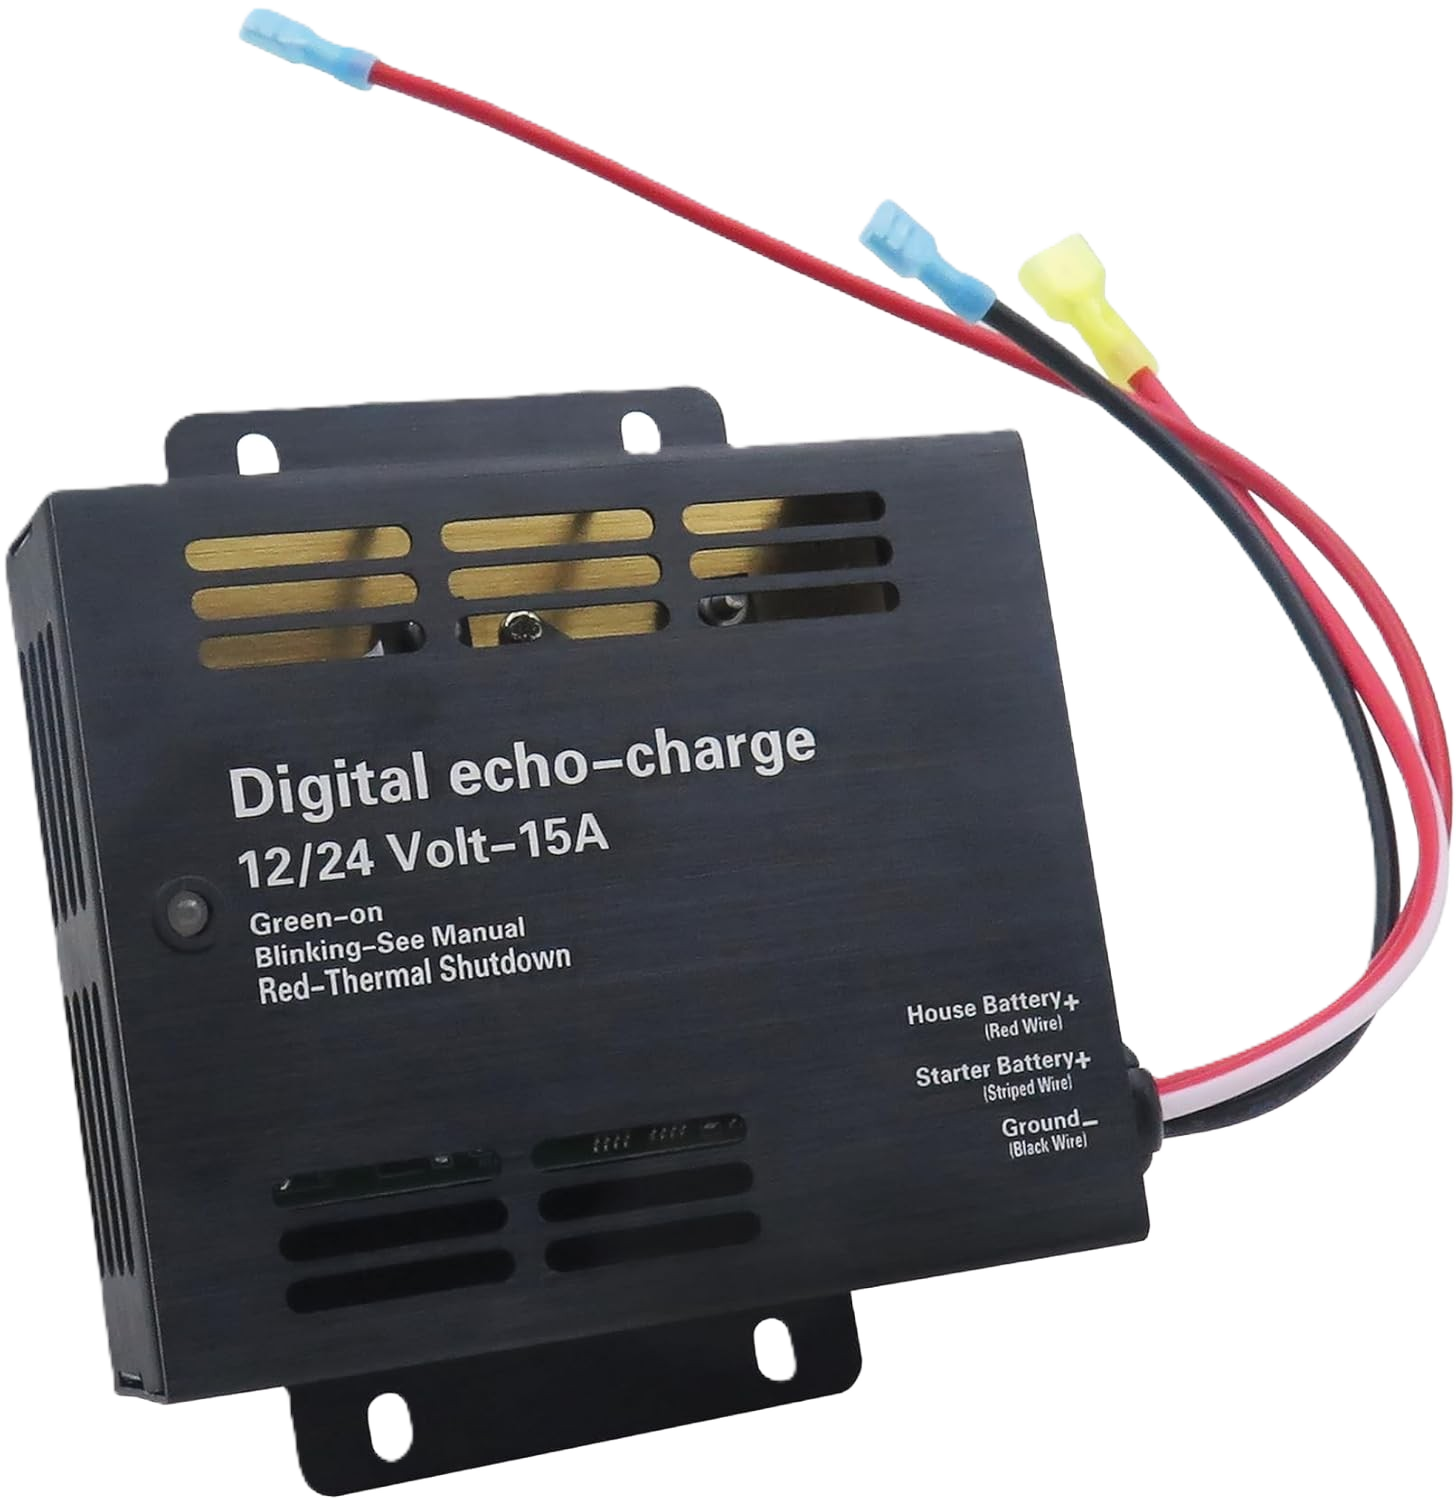 |
I wanted to be able to monitor the system from anywhere over the Internet. I installed the Victron Cerbo GX System Monitor which connects to all the VE.Direct/Bus connections on the other components and makes them available to the Victron App anywhere in the world. NOTE: you must have an Internet connection in the RV that it can connect to. Finally, I installed a Xantrex Auxiliary Battery Charger in the electrical bay and wired it up to the Lynx Distributer. This keeps the chassis (starter) battery fully charged and maintained. NOTE: You need to adjust the engine start sensor voltage up on the DC/DC charger to about 14.3v so that the Xantrex and Victron do not get into an endless cycle. |
SHOWER |
[back to top] |
 |
The stock shower head leaves a lot to be desired. I replaced the stock shower head with the Oxygenics RV shower head and replaced its on/partial-off valve with a true on/off valve which will completely shut off the water while lathering up. Finally, I added Double Wall Mount Shampoo/Soap Pump Dispenser to the right of the shower head. It affixes to the shower wall with supplied VHB tape. This works perfectly and gets rid of all the bottles in the shower. |
VENT FANS |
[back to top] |
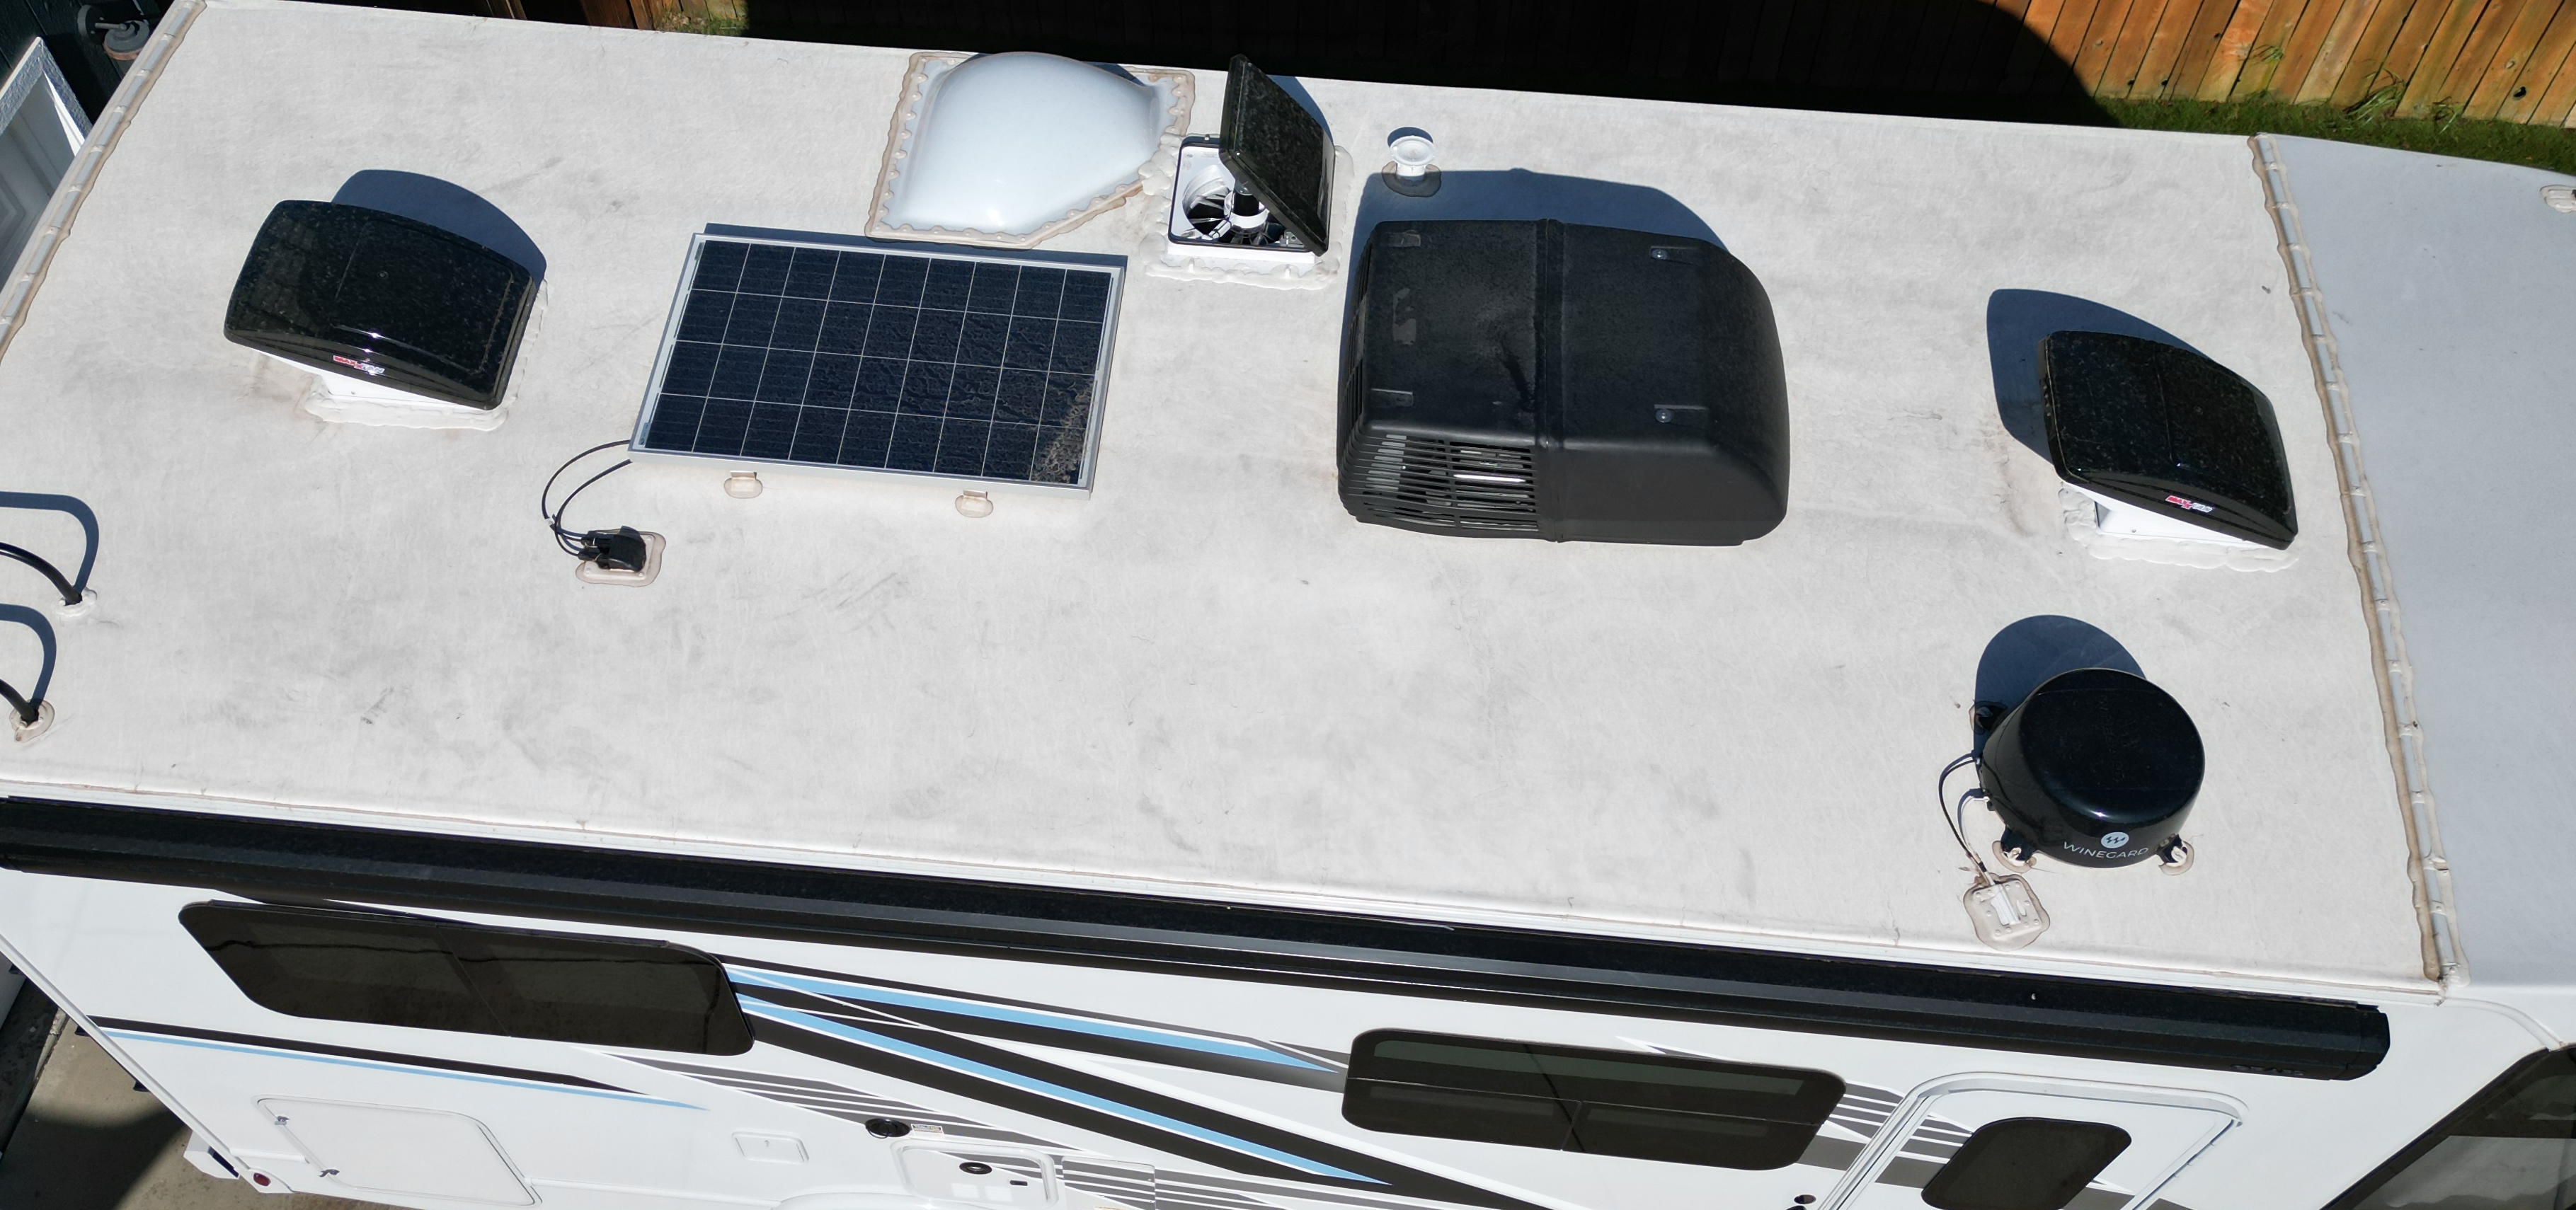 |
The stock roof vent fans are little more than computer fans. I replaced the living room and bedroom fans with the MaxxFan Deluxe Vent, Fan and Cover All model - these can be open and running while driving or if it is raining! I replaced the bathroom fan with a Maxxfan Plus which does not have the cover that can be open while driving, but the bathroom skylight cover is so close to the fan's cover that there was not room. |
ACCUMULATOR TANK |
[back to top] |
 |
My water pump was cycling all the time - even after the smallest usage. I installed a 2 gal water accumulator tank (bladder) on the wheel well under the passenger side bed (where the water pump is). What an amazing difference! No more water pump cycling while brushing teeth, washing dishes, taking shower, etc!!! It took less than a half hour of time. I'm not sure why these don't come standard! This one comes pre-pressurized at 30psi and is perfect for the pump settings - no adjustment was needed. |
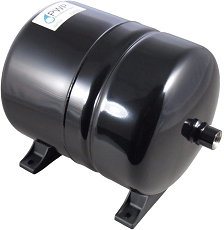 |
Plumbing items needed: PEX pipe (blue for cold), a male threaded 1/2" NPT elbow with PEX crimp on one end, a couple of PEX elbows, and a PEX tee to install. Get a good quality PEX crimper, a PEX cutter and PEX crimps. First, follow the pump's OUTPUT line past where it tees off to the winterizing water-heater cut-off valve (white plastic valve next to the thermometer in the middle of the picture) and cut the existing PEX pipe with a PEX cutter. Attach the male threaded NPT to PEX elbow to the bottom of the tank (use thread sealant) so that it points to the left (pointing toward passenger side of RV). Attach about a foot of PEX pipe to the NPT/PEX-elbow now on the bottom of the tank and crimp - position heading inward as shown in the picture. Mount the tank to the wall. Next, attach a PEX elbow and crimp. Attach about 4 inches of PEX pipe to the other end of the PEX-elbow and crimp. Attach the PEX tee to it and to both cut ends of the existing PEX pipe (don't forget to slide the crimps on BEFORE the pipe). After getting the placement you want, crimp all three sides of the tee. This is a good time to inspect the pump and clean out the filter-screen. If you need to replace it, this is the replacement pump. |
AIR CONDITIONER |
[back to top] |
 |
Air Conditioner Air Flow Improvement Watch video on YouTube Simple A/C modification to dramatically improve air flow in the RV ducts and the efficiency of your roof A/C unit. |
 |
all you need is: AC Foil Tape 1 inch rigid foam insulation board Jig saw or Break-off razor knife (note: Jig saw is much easier) Tape measure
|
INTERNET ACCESS |
[back to top] |
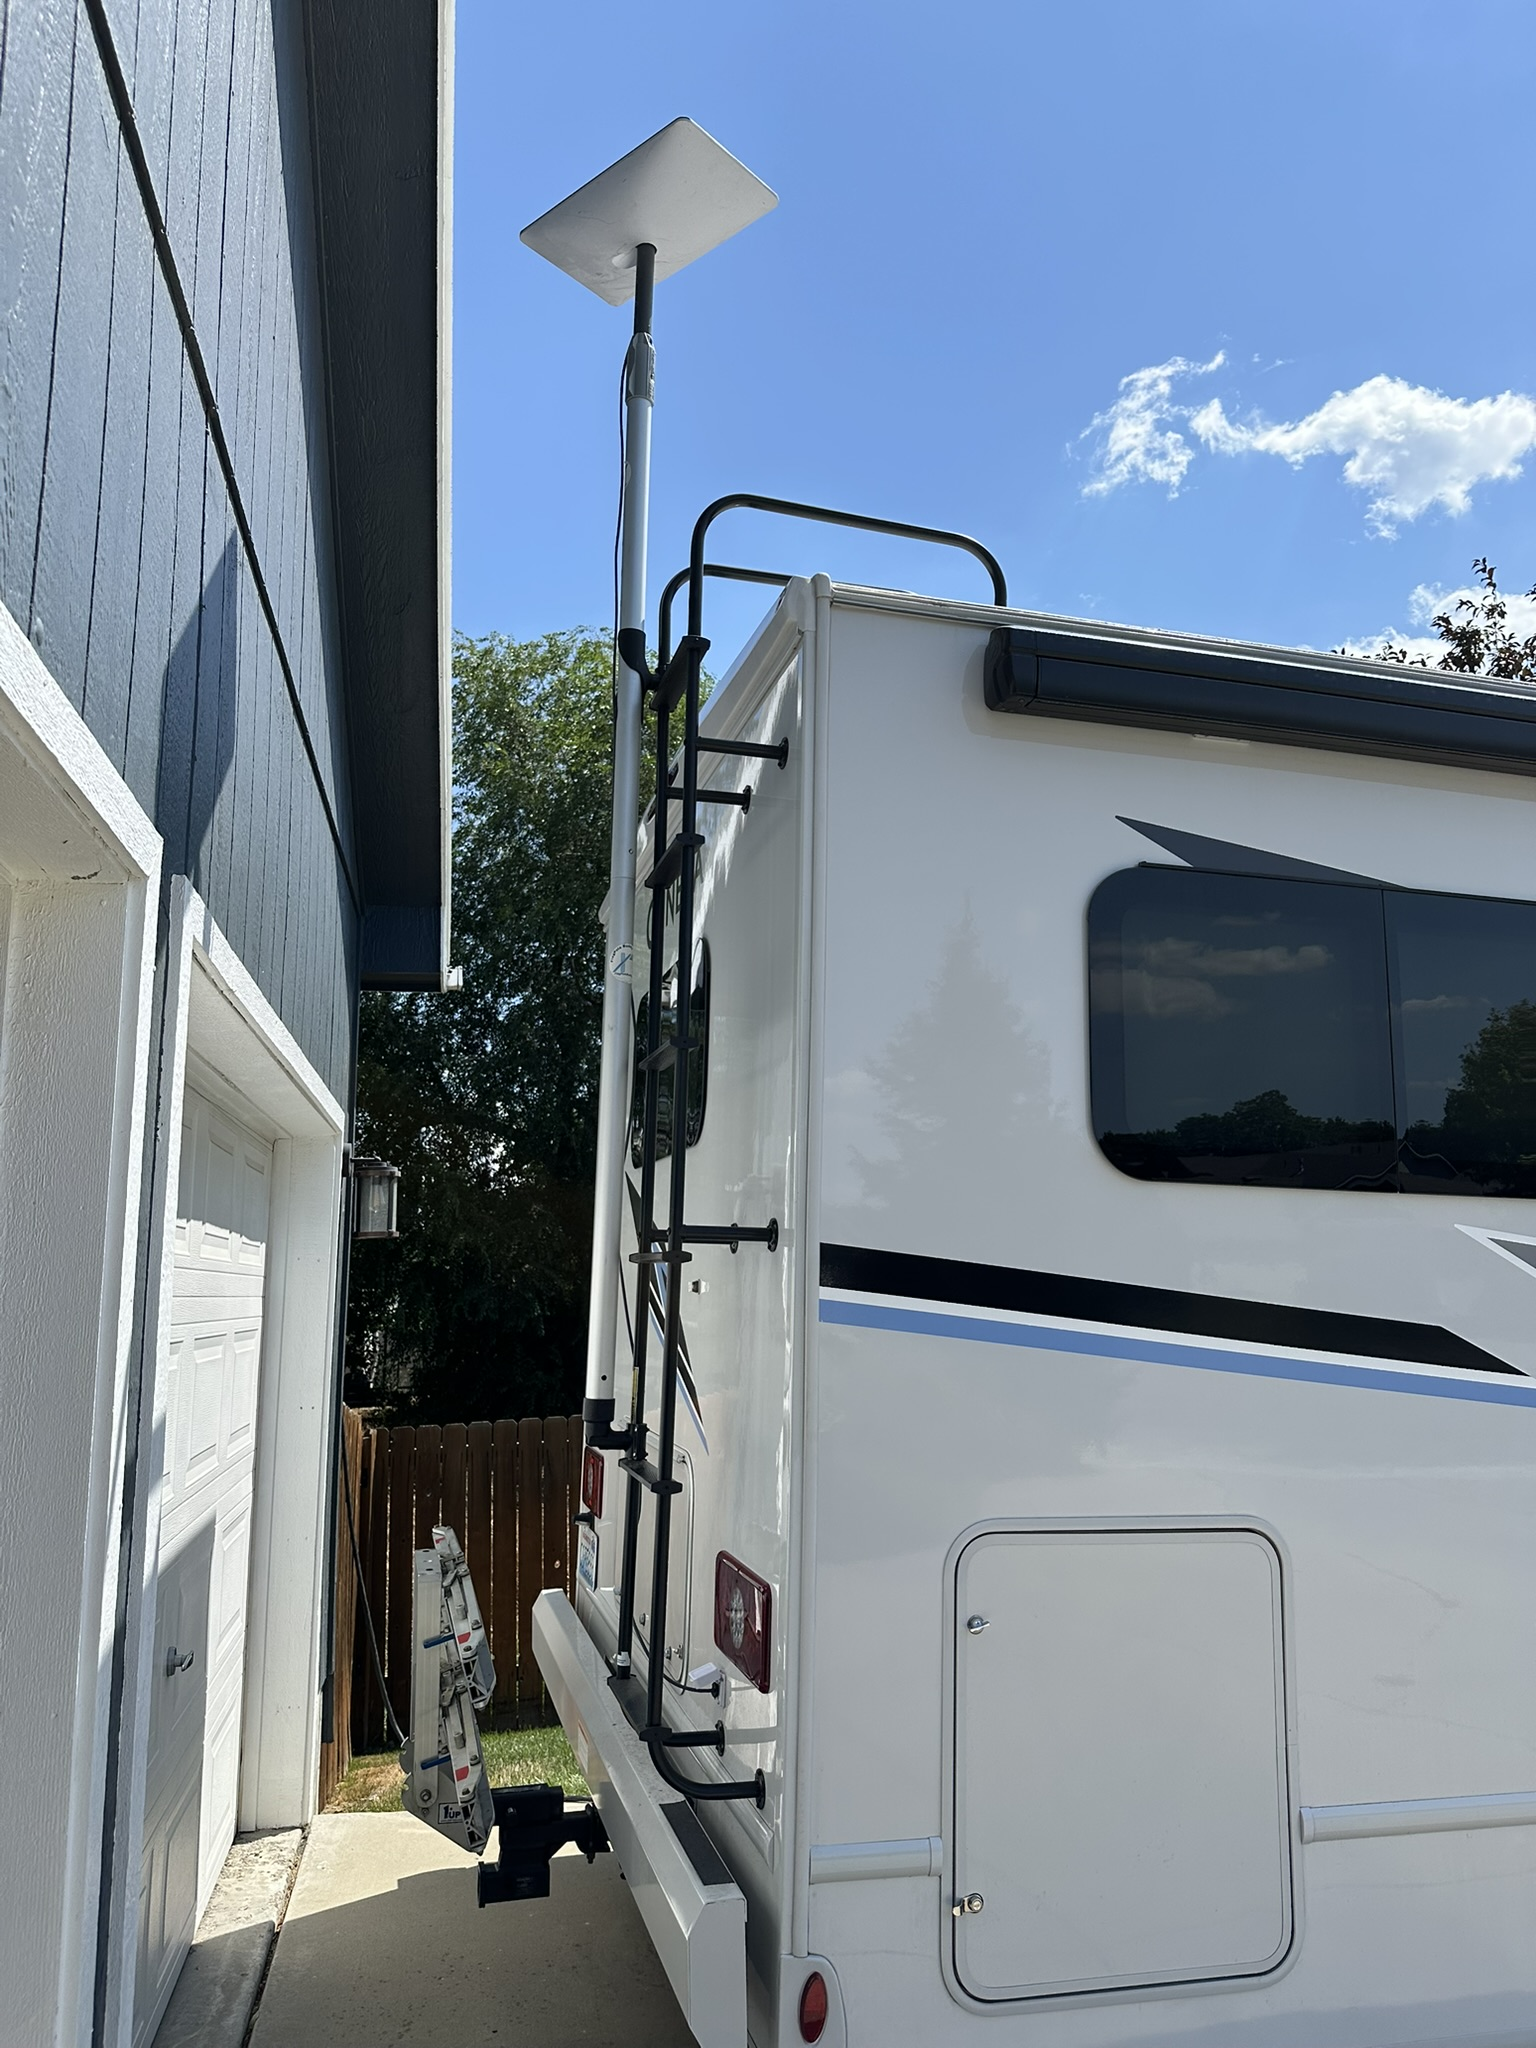 |
Starlink came out with a service offering for RVer's. They have a mobile cabable dish (InMotion), but very expensive, so I opted for the normal one and attached it to a Flagpole Buddy's pole and Dishy attachement. The monthly service is not cheap, but you can shut it off for the month(s) you don't use it without charge! |
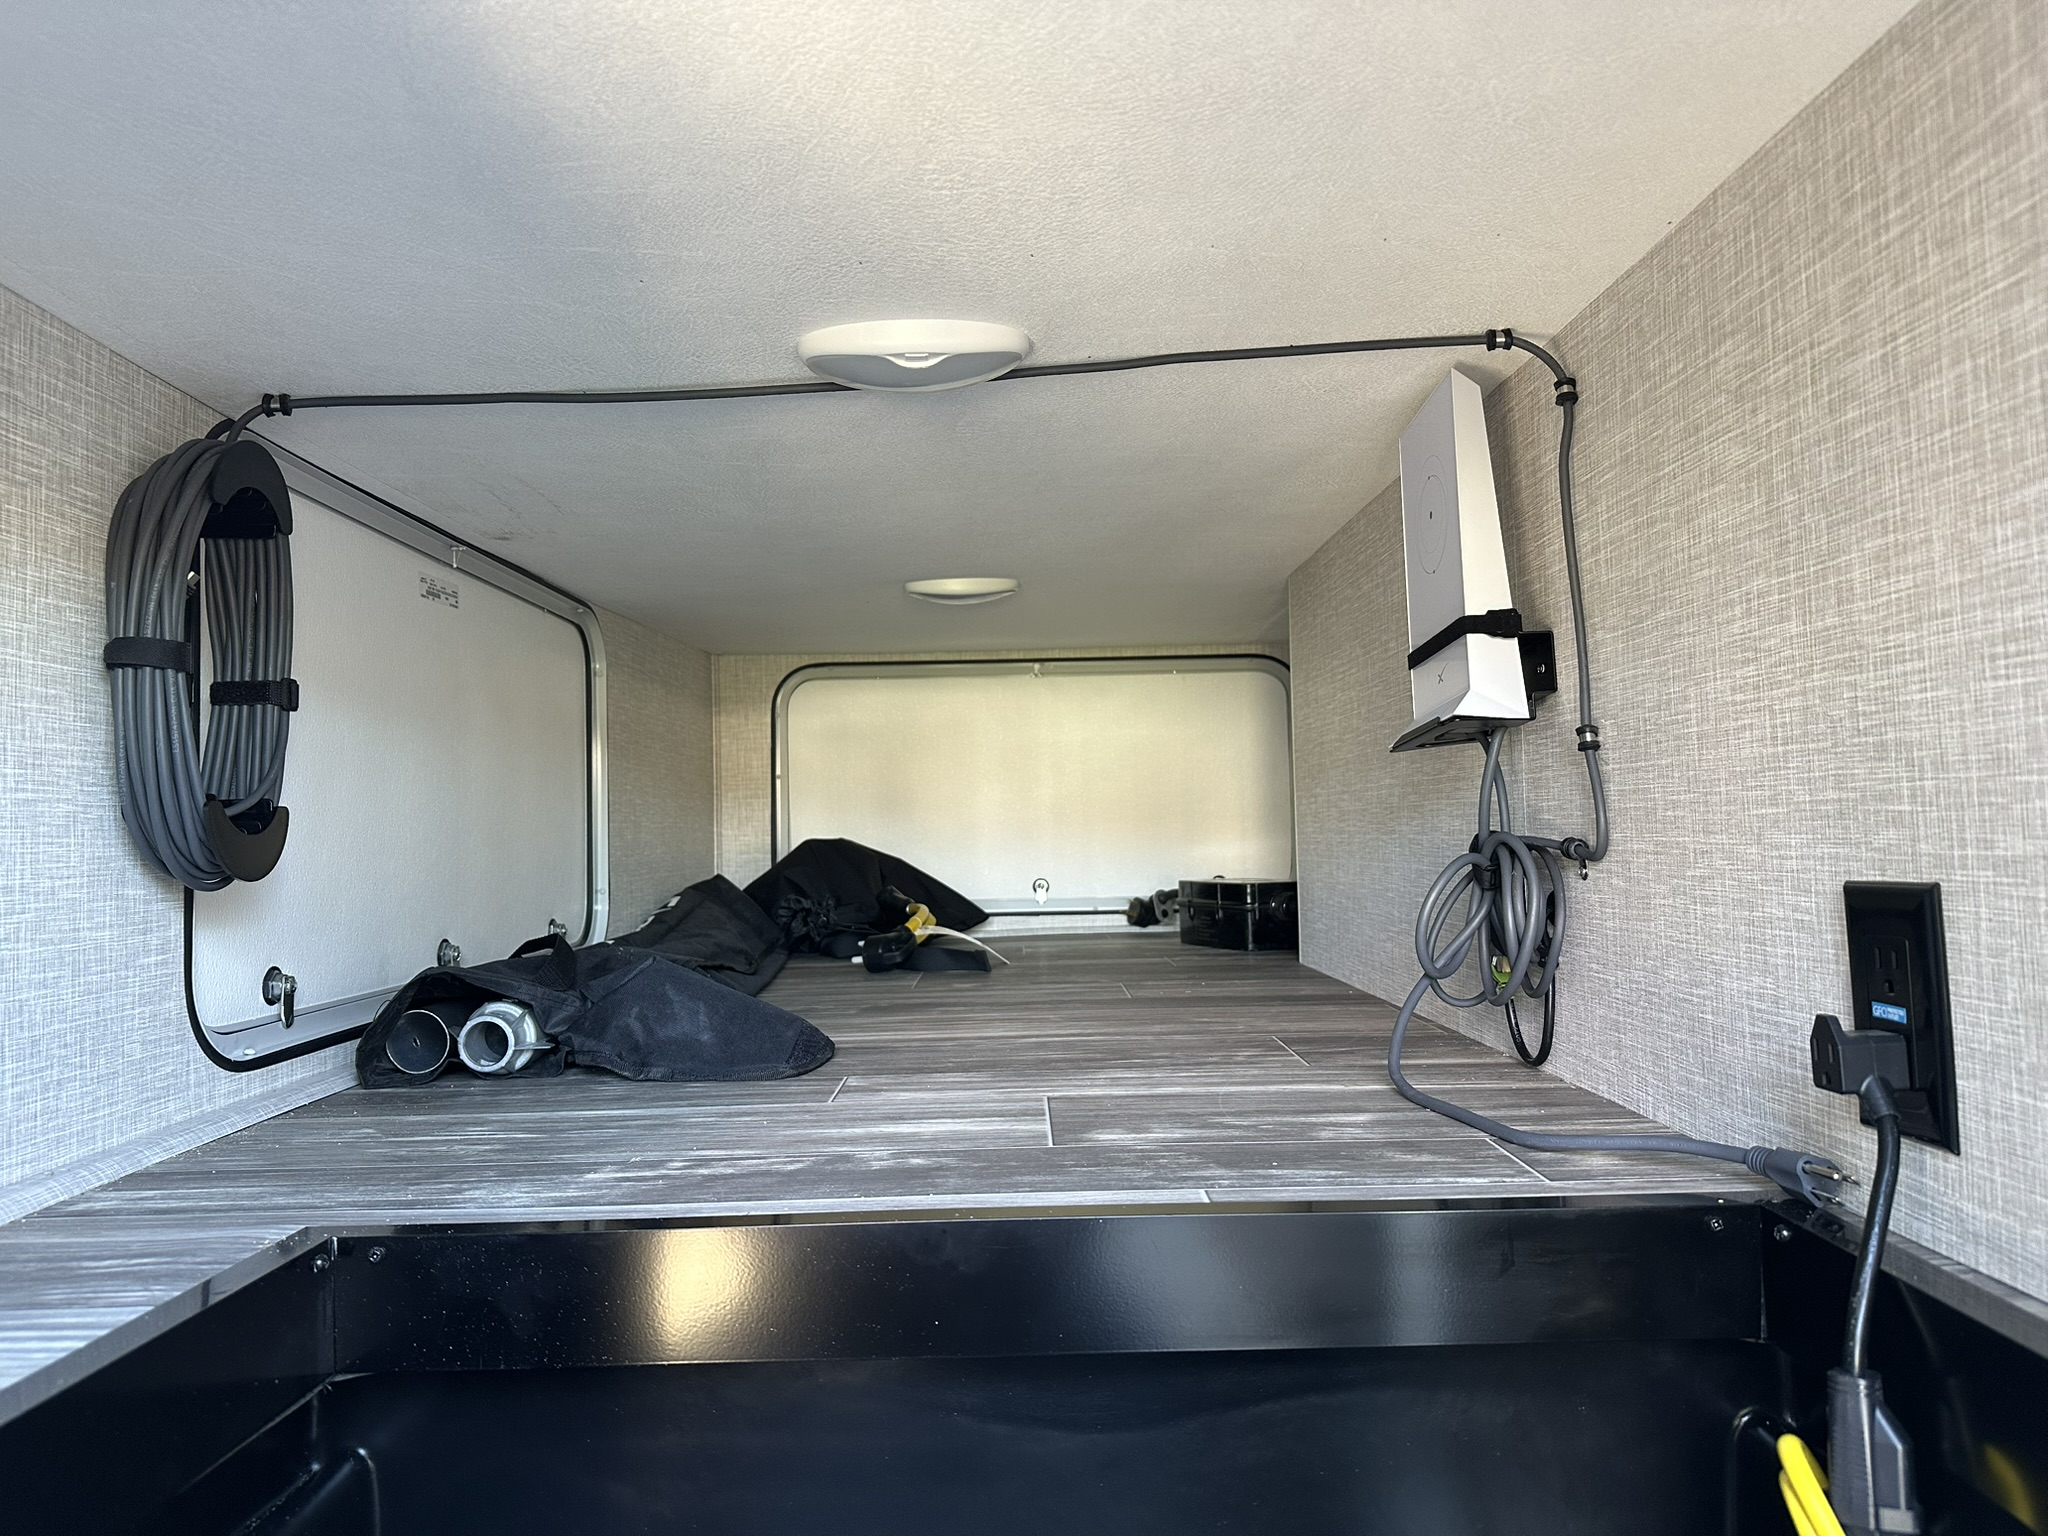 |
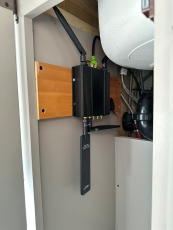
I mounted the Starlink router and wires in the rear storage bay using this Metal Router Mount and this Cable Management. I drilled a 3/4" hole just behind the RV ladder and put a water-proof access cover (removed cable nipple and used a 3/4" hole saw to drill lareger hole for the cable) there so the Dishy cable can run out to the pole. Then I ran Internet cable from here to kitchen where the main MAX 5G router. I still have cellular as a backup which the Pepwave MAX 5G router automatically switches back and forth depending on connectivity. The router is mounted under the kitchen sink. In addition to all the streaming we do, I work remotely, so we have a large need for high-speed reliable Internet service.
|
 |
|
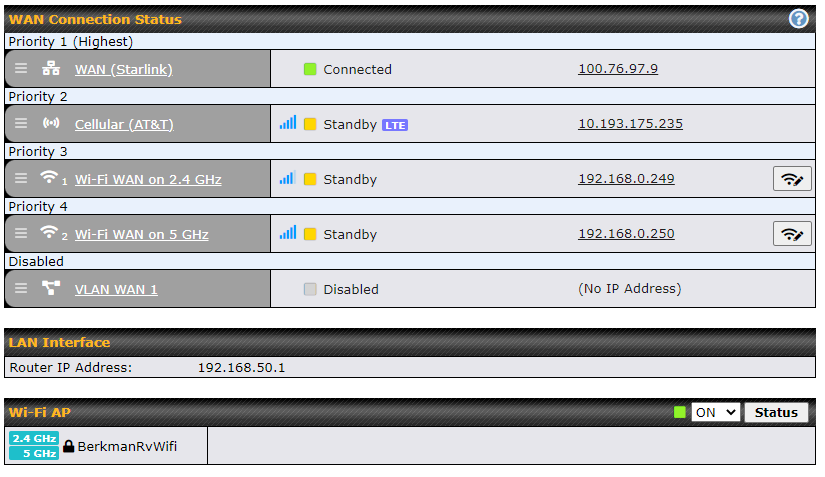 |
I use the Pepwave MAX 5G router for the AT&T plan with a Parsec Husky antenna with magnetic mount and an 18" ground plane attached to the roof to bring Internet into the RV from cellular and broadcast our WiFi signal throughout. One of the WAN ports on the Pepwave connects to the Starlink. The external antenna also allows us to connect to other WiFi sources for when we are staying somewhere with decent WiFi, usually only when "Moochdocking"; allowing us to bring the Internet into the RV an external WiFi source. The Pepwave also supports the GPS in the Parsec antenna. This is handy because all of the Victron equipment and the Pepwave "InControl" use it and track my position through their dashboards and history. So, no matter where we are or what sort of signals we have access to, we are always connected and all of it managed by the Pepwave router automatically. There are less expensive setups that can work, but remember what I said earlier about my need for high-speed, reliable Internet service. We have rock-solid Internet most everywhere we go. |